Anchor each conversation to visual context for swift and precise collaboration with real time markups.
When you open a file, you'll see a number of rich tools available to you. Let’s quickly orient ourselves.
A - Selection Tool
B - Markup Toolbar
C - Undo and Redo
D - The Markup List
E - Properties Bar

Selection Tool
|
Use the selection tool for: - Selecting a markup by clicking it with this tool - Selecting a group of markups by dragging a rectangular selection area over the markups. Once a group is selected, they can be deleted or moved as a group.
|
Hand Tool |
Switch to the hand tool for: - Navigating the document without the risk of moving or altering markups. - Click and drag to change your view to specific portions of the document, especially helpful when zoomed in. |


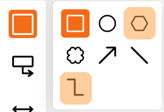
Shape Tool
|
Selecting the Shape tool brings up a choice of 7 shapes: rectangle, circle, polygon, cloud, arrow, line, and polyline. For most shapes, the creation process remains consistent – simply click and drag to define the desired size, then choose from 16 line styles and 16 colors for fill and border. There are two exceptions to this rule: polygon or polyline. |
Polygon and Polyline
|
These flexible tools let you make custom shapes and lines. Click to add sides, double-click to finish. Common uses include piping, walls, etc. |
|
|
|
Callout Tool |
The Callout tool merges the functionality of a Textbox and an Arrow. Similar to our other tools, it starts with a click on the area you intend to highlight, followed by dragging your mouse to position the textbox. Upon releasing the mouse button, you gain instant access to type within the textbox. When you've completed your annotation, a quick press of the ESC key on your keyboard returns you to your file. Should you need to make edits to the text, a straightforward process is in place. Click on the Callout markup, then perform a double-click on the textbox to initiate text editingThe Callout tool combines a textbox and an arrow. Here's how it works: |
Measurement Tools |
There are three measurement tools: Length, Polylength, and Area. Access them by clicking the length icon. Before measuring, set the scale first. |
Length Tool
|
This tool measures straight-line distances. 1 - Click to start the measurement. 2 - Click again to set the end point. |
Polylength Tool |
To measure the total length of connected lines, use the Polylength tool: 1. Click to start measuring. 2. Click at each bend or pivot point along the path. 3. Double-click to end the measurement. The complete length will be displayed. |
Area Tool |
This tool automatically calclates the enclosed area for you: 1 - Click to start outlining the shape or space 2 - Click at each corner 3 - Close your boundary of the area displayed by double-clicking. The total area inside the outlined shape will be displayed. Here's a brief video on area.
|
Pencil |
The Pencil tool is used to make handwritten markups or notes. To use, click and drag to produce the markup. |
Textbox Tool |
The Textbox tool enables you to enter text of your choice and reposition it by drag and drop. A single click will create the textbox and allow you to start typing. Once your typing is complete, you can exit the text input mode by pressing the ESC key, returning you to your file. |
C - Undo and Redo |
|
|
While creating markups, you might have found yourself wanting to Undo or Redo your work. This can be accomplished using our simple Undo or Redo buttons. |
|
Undo
|
The Undo tool reverses the most recent action performed on the file by you alone. It does not impact markups created by other users. Keyboard Shortcut:
|
Redo
|
In contrast to the Undo tool, the Redo tool reinstates the most recent action that was previously completed. Similar to its counterpart, it exclusively applies to your own markups and does not impact those created by other users. Keyboard Shortcut:
|
D - The Markup List |
|
|
Managing collaboration among multiple users on a single file can be challenging. To address this issue, we introduce the Markups list, a comprehensive, real-time collection of all current markups within the file. If you’d like to find a particular markup from the list within the document, simply click the markup in the list and you’ll be instantly taken to that markup on any page. To see the Markup list, click on the Markups tab at the bottom of the page. To sort the list, simply click the heading of the field you’d like to sort by. To export the list, click the three dots on the top right corner of the list and the Markups list will be exported to CSV.
|
|
|
Below are the fields found within the list.
|
|
E - The Properties BarOnce you’ve created a markup, you’ll notice a properties bar appear above the markup. This is your opportunity to style the markup further, collaborate with that markup, or take action in it. |
|
|
|
|
Tool label |
Indicates which tool you’ve used to create the markup. |
Line Style16 line styles |
|
Line Color15 colors and transparent |
|
Arrow Styleavailable for measurements |
|
Font Size |
Small, Medium, Large, and XLarge |
Assignments
|
Learn more about assignments |
Share a link to a markup
|
Learn more about collaborating in ActiveDraft |
Lock a markup
|
Once the lock is selected, your markup will be locked from others. |
Delete markup
|
Delete your markup |
Deleting Multiple MarkupsIf you'd like to delete more than one markup: 2 - Click and drag across the markups you'd like to delete. You'll now see that multiple markups are selected. 3 - For a macbook user, you'll need to hit the fn 🌐 + delete keys. For PC users, you'll just hit the delete key.
Need more support? We'd love to help! Email us at support@activedraft.com |
|